Project: Adding Closets

Project: Adding Closets

When I first bought the log cabin, it had two bedrooms. One was small and the other was even smaller.

The wall between them had each room’s closets.

Project: Adding Closets to the log cabin - The only place the bed could fit was under the window.
The only place the bed could fit was under the window.

The only place you could put a bed was under a window. The other walls had doorways in them. Even after I replaced the window, there was always a cold draft coming down the wall.

I really wanted to put the bed against the other wall, so that I could look out the window in the morning. My dad suggested a bump out closet.

I did all the research for my dream closet. I designed it to perfectly fit all of the components.
I pulled the permits and my son-in-law got to work.

Project: Adding Closets to the log cabin - We put the closet on this wall, centered between the windows.
We put the closet on this wall, centered between the windows.

The closet would be centered on this wall.

Project: Adding Closets to the log cabin - We got as close to the gas pipes as we could, but the closet was smaller than I had planned.
We got as close to the gas pipes as we could, but the closet was smaller than I had planned.

This is a gas meter. The gas pipes were in the way. The closet had to be narrower than the plan. I should have made it deeper, but I didn’t.

Project: Adding Closets to the log cabin - The footers are dug and the rebar is in.
The footers are dug and the rebar is in.

There was a concrete sidewalk that predated the log cabin. Beau cut the concrete and dug the footers.

Project: Adding Closets to the log cabin - Footers dug and rebar in. Ready for the concrete pour.
Footers dug and rebar in. Ready for the concrete pour.

After he dug the footers, he put in the metal and got the inspections signed off.

Project: Adding Closets to the log cabin - Rebar
Rebar

The metal is rebar, which means “reinforcing bar.” It is to reinforce the concrete in the footers, to make it stronger. It has a texture to make it bond to the concrete.

Project: Adding Closets to the log cabin - Pouring the Footers
Pouring the Footers
Project: Adding Closets to the log cabin - Pouring the Footers
Pouring the Footers

We poured the footers. Building a closet addition is the same as building any other addition.

Project: Adding Closets to the log cabin - Connecting the foundation of the closet to the foundation of the house.
Connecting the foundation of the closet to the foundation of the house.
Project: Adding Closets to the log cabin - Closet foundation with ledger
Closet foundation with ledger
Project: Adding Closets to the log cabin - Inside the foundation of the closet. The block walls and ledger,
Inside the foundation of the closet. The block walls and ledger,
Project: Adding Closets to the log cabin - Framing the Closet Floor
Framing the Closet Floor
Project: Adding Closets to the log cabin - Closet Floor Insulated
Closet Floor Insulated

Beau framed the walls and ceiling.

Project: Adding Closets to the log cabin - Closet Trusses
Closet Trusses
Project: Adding Closets to the log cabin - The first sheet of plywood after the closet was framed.
The first sheet of plywood after the closet was framed.

He insulated it thoroughly.  Very thoroughly.

Project: Adding Closets to the log cabin - The log walls were reinforced, then the doorways cut in.
The log walls were reinforced, then the doorways cut in.

Once the floor was put in, he cut the walls through the logs.

Project: Adding Closets to the log cabin - The floors perfectly lined up.
The floors perfectly lined up.

The floors perfectly lined up.

The only thing holding the house up is log. Beau reinforced and supported everything before he made the first cut. We REALLY did not want the house to tumble down because we were undercutting two large holes in the same wall.

Project: Adding Closets to the log cabin - Those are the logs we cut out to make the doors.
The closet is framed and insulated. Those are the logs we cut out to make the doors.
Project: Adding Closets to the log cabin - The closet is framed, insulated and wired for the lights.
The closet is framed, insulated and wired for the lights.
Project: Adding Closets to the log cabin - Wiring in the closet. The framing is the back of the guest room closet wall.
Wiring in the closet. The framing is the back of the guest room closet wall.

We put in an outlet, a switch and two ceiling lights.

Project: Adding Closets to the log cabin - We finished the closet walls with wood, some of it cedar.
We finished the closet walls with wood, some of it cedar.

The interior walls are all wood, some cedar, to keep moths away. Do you see that level? My closet is the only square part of the house. My daughter married well!

Project: Adding Closets to the log cabin - Bump-out Closet Addition
Bump-out Closet Addition

The exterior walls are Hardie Board, board and batten.
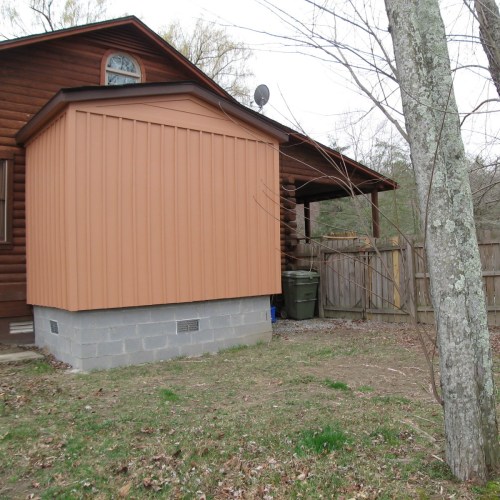
Project: Adding Closets to the log cabin
Bump-out Closet Addition
Project: Adding Closets to the log cabin - The Bump-out Closet
The Bump-out Closet

This is the final closet.

Inside there is a closet for each room. The guest room has a small closet.

The nearly finished closet with built-in drawers, rods and shelves

Beau installed built-in drawers, closet rods and shelves. It fits everything!

Beau removed the earlier closet walls, framed a new wall and drywalled it. He repaired the floor and fitted in hardwood flooring so you can’t see where the wall used to be. The electrician came and moved the outlets and switch.  We passed all the final inspections. I like the trim around the new closet door so much, I had him replace the rest of the cabin trim to match.

Project: Adding Closets to the log cabin - The bedroom, with the new closets.
The bedroom, with the new closets.
Project: Adding Closets to the log cabin - The bedroom, with the new closets.
The bedroom, with the new closets.

The bedroom is just the right size! I can put the bed against the wall, where I wanted it.

What a difference!

Before and After Photos of the Bump Out Walk-in Closet >


Discover more from Project Small House

Subscribe to get the latest posts sent to your email.