Adding a Sprayer to our Delta Kitchen Faucet

We added a sprayer to the kitchen faucet that came standard with our Schumacher Home.

Schumacher offers a lot of options, but we decided to stick with the kitchen faucet that was included.

Included Linden kitchen faucet (chrome)
Single handle kitchen faucet. Spout swivels 120 degrees for added convenience.
The upgrades with a sprayer were all the kind that has the actual spout pull out as a sprayer. I really don’t care for those. If you want it to stop spraying, you have to turn off the water.

The plumbers put in the faucet. They cut through the Corian counter pretty easily.

A1 is the escutcheon
A2 is the faucet
A3 is the gasket
B1 is the mounting nut and washer
B2 is the mounting shank
B3 is the diverter
B4 is the notches
B5 is the locking screws
We did not put in the faucet ourselves, but we looked it up to see how it worked so we could add the sprayer later.
Center Mount Faucet Installation
A) Install round escutcheon (1) onto faucet (2). Insert faucet through gasket (3) and mounting hole in sink.
B) Thread mounting nut and washer (1) onto mounting shank (2). Note: When sliding washer and nut (1) over diverter (3), keep tubes positioned in the notches (4) on both sides of the nut and washer. Tighten mounting nut securely by hand. Using a Phillips screwdriver, tighten locking screws (5).

Here is the faucet as soon as it was installed.
Sprayer Installation Instructions

2 is the spray hose
Mount spray support assembly (1) in far right hole in sink.
HAND TIGHTEN ONLY.
Insert spray hose (2) down through spray support.

2 is the spray hose
3 is the diverter
Pull diverter clip (1) outward until loose; but, do not completely remove.
Remove diverter cap (2) from diverter (3) and discard if installing a side spray.

Keeping the diverter clip pulled out, insert spray hose nipple (4) into diverter.

Make sure the hose nipple is completely inserted and then push diverter clip (1) in until it locks the hose nipple into place.
Pull down moderately to ensure connection has been made.
Sounds really straight forward.
The Parts We Ordered

Delta Faucet RP50787 Vegetable Spray Support Assembly
These are the parts:
Delta Faucet RP53880
Pilar, Spray, Hose and Diverter Assembly, Chrome
Side Spray & Hose Assembly
- Spray head, hose, and diverter included
- Coordinates with Pilar kitchen faucets
- Backed by Delta Faucet’s Lifetime Limited Warranty
Delta Faucet RP50787
Gala, Vegetable spray support, Chrome
Vegetable Spray Support Assembly
There were other options, but these were priced right on Amazon. They look and work great!

The part we had to run out for
Cliff couldn’t find his 1″ hole saw drill bit, so we had to run to Lowes. We are still not organized here.
Installing the Sprayer

Cliff put down a couple of pieces of blue tape around where I want the sprayer.
Then he measured to find the center point of the faucet.

He made a mark, then checked under the sink to make sure nothing there was going to interfere.

He drilled the hole with the 1″ Hole Saw Drill Bit.

Then he vacuumed and wiped everything down.

The instructions said to use a 1″ Hole Saw Drill Bit, but it was really tight, so he worked on it a little bit with a 1″ drill bit.

It is still very tight.

But, with a couple of good wacks with a mallet, it pushed through.
He removed the blue tape. He was going to add some silicone, but it was so tight, I didn’t see any point.
Then he threaded the sprayer into the hole.

Here are the two parts that go together.
He vacuumed the flakes out from in the sink and turned off the water.

Diverter clip locks the hose nipple into place
It was super simple!
Pull out that blue clip.
Push the sprayer hose nipple in.
Push the clip back in.

Turn the water back on and we have a sprayer!

Before
This is what it looks like under the sink looking up. Above is before the sprayer, with the blue plug. Below is after, with the sprayer coming through the counter and plugged into the bottom of the faucet.
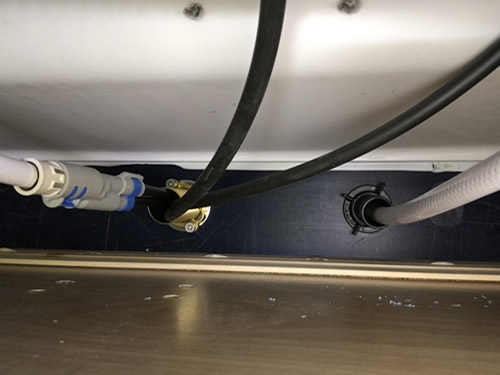
After
So, if you see that blue plug at the bottom of your Delta faucet, this is how easy it is to add a sprayer!
Discover more from Project Small House
Subscribe to get the latest posts sent to your email.